After a long time of inactivity, we are back with the second part of this mini-series of the virtual smart card deployment guide.
Configuring Outlook
Luckily (or, should we say, by careful design?) there are very few things to configure in the Outlook client. The certificate(s) that we are going to issue, either encryption or digital signature ones (or both), are going to be immediately recognized by Outlook. Subsequently, they are going to be placed in the correct containers, which can be seen by taking a look at File -> Options -> Trust Center -> Trust Center Settings -> Email Security -> Settings. There, we can find the relevant text box which will indicate the encryption and the signing certificates. If we create two different certificate templates for the relevant purposes, Outlook will automatically understand the purpose of each certificate and place each one in the correct container. If we create one certificate for both purposes, which is not recommended due to the sensitive nature of the signing operations, Outlook will use this one for both operations and you will see it both text fields in that window.
One more thing to note about Outlook is that the sign and encrypt buttons will appear in the Outlook’s “New Email” window only after the first encryption or signing takes place. This is a bit awkward for users. One way to circumvent this behavior, and thus “instruct” Outlook to always show the buttons, is to push a specific registry to Outlook clients. This key can be found at HKEY_CURRENT_USER\Software\Microsoft\Office\15.0\Outlook\Preferences. The new entry should be SecurityAlwaysShowButtons (as a DWORD) with value 1. This example refers to an Outlook 2013 client, so for previous versions of Outlook, we need to replace 15.0 with the specific version (for example, 14.0 for Outlook 2010 etc.)
Creating the virtual smart card
We create a virtual smart card in the user’s PC by opening an administrative command prompt and running the following command: tpmvscmgr.exe create /name VSC /pin prompt /adminkey random /generate. Let’s explain what this command’s parameters mean (more information can be found in the Understanding and Evaluating Smart Cards document):
- name refers to the name that we give to the virtual smart card – it could be anything we choose.
- Pin is, of course, the PIN that protects the VSC – in this case, prompt prompts the user to enter one of his/her liking. It is highly advisable that, at this point, the PIN should be entered by the user and be known only to him/her. The documentation has small error at this point.
- Adminkey is the administrator key that can be used to administratively access the VSC and reset it, if locked
- Generate is needed if we are not using FIM CM for the creation of the VSC (which, by the way, is highly recommended for most demanding deployments)
The process of TPM virtual smart card creation will take some time (usually around 2-3 minutes, depending on the hardware). You have to wait until the final confirmation by the system is displayed. The Instance ID of the virtual smart card reader should appear as ROOT\SMARTCARDREADER000 by default. We can also verify the creation be checking the Device Manager, where we will find the newly created reader with the name that was entered at the creation command.
In the next post, we will share some final details on VSC creation and Outlook.

VSC in Device Manager
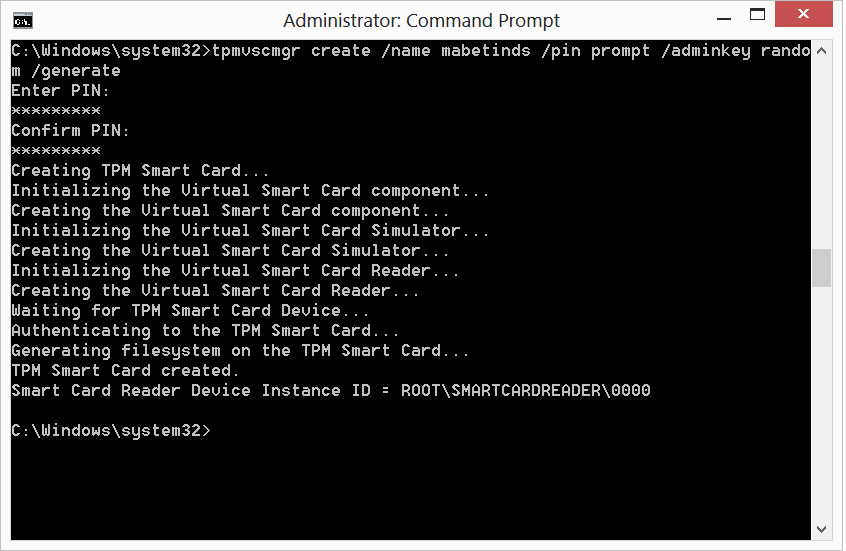
Process of virtual smart card creation

Nice article!
If you want to use virtual smart cards in a larger deployment, I recommend trying vSEC:CMS:
http://versatilesecurity.com/versatilesecurity-virtual-smart-card.php
It’s evident from the content of these articles that the approach is not scalable for large, enterprise use. There are several enterprise solutions for virtual smart card deployments, including FIM CM, MyID, vSEC:CMS and others.